
Get started
- Install Handig BDD from the Atlassian Marketplace. It is free for sites with up to 10 users.
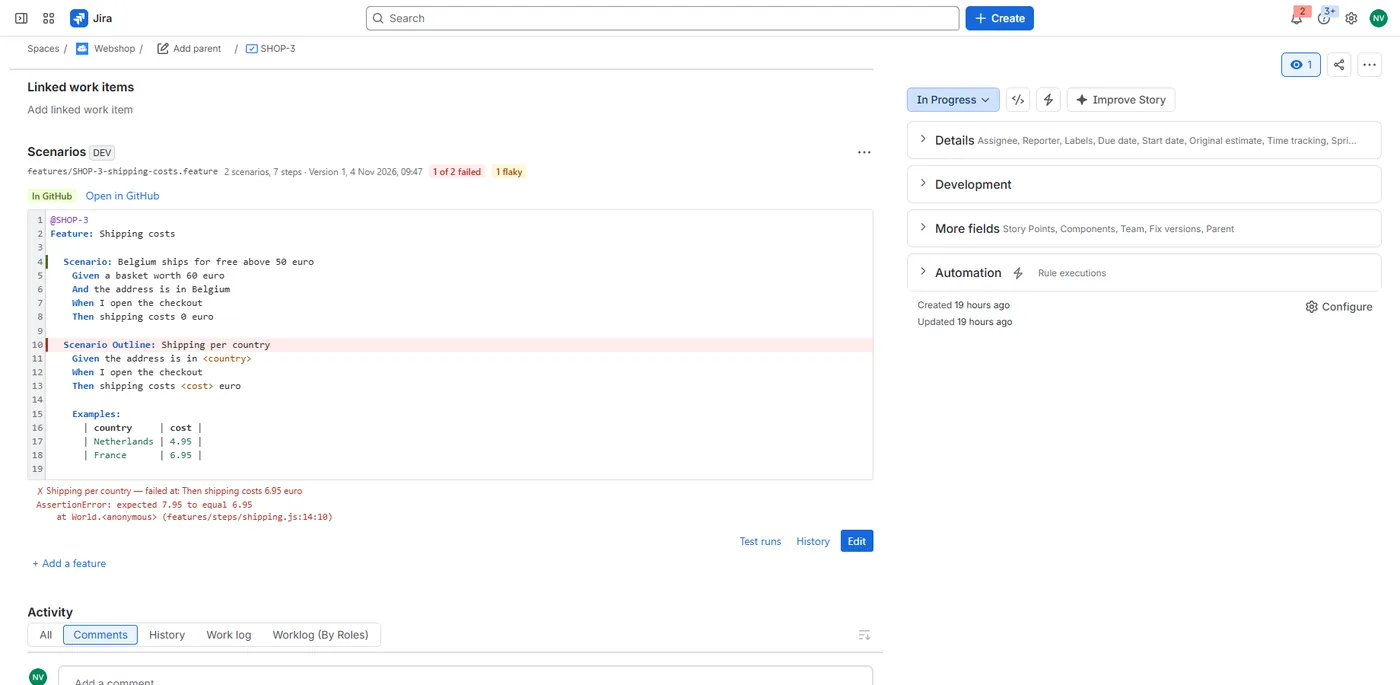
- Open a work item, choose the apps button under its title and pick Scenarios. To show it on every work item, choose Show for all work items in the panel's ••• menu.
- Choose Write scenarios. The editor starts with a Feature named after the work item.
- Optional: connect the project to Git (below), send results from CI (below), or import from Behave Pro.
Write scenarios
Each work item can have several feature files. The editor highlights Gherkin, checks the file while you type and explains each problem in plain language: a misspelled keyword (with the word it probably should be), a table row with the wrong number of cells, a scenario without steps. Save stays off while Cucumber would refuse the file; warnings don't stop you. While you type a step, the editor suggests steps already used in the project. Ctrl+S saves. Gherkin's 80 languages work: start the file with # language: nl, for example.
Every save is a version. History shows earlier versions; restore one in the editor. When someone else saved while you were editing, you choose: keep your text as the next version, or take theirs.
New files are named after the work item and the Feature, like features/SHOP-12-checkout.feature, so Git and CI can find them.
The project page
The project's Scenarios page lists every feature file with its scenarios, its latest result and when it last changed. Filter by work item key, Feature or scenario name, or tag.
Search with JQL
bddScenarios > 0: work items that have scenarios;bddFailed > 0: work items with a scenario that failed in the last CI run;bddPassed = 3: work items with exactly three passing scenarios;bddInvalid > 0: work items with a file that has Gherkin errors (an import keeps such files).
Sync with GitHub, GitLab or Bitbucket
Each project can keep its scenarios in its own repository, branch and folder. As a project admin, open Project settings → Handig BDD, pick the host, enter the repository, branch and folder, paste a token and choose Save and connect. The token is checked, kept in Forge's secret storage and never shown again.
| Host | Repository | Token |
|---|---|---|
| GitHub (github.com) | owner/repository | A fine-grained personal access token for that repository only, with Contents: Read and write and Webhooks: Read and write. |
| GitLab (gitlab.com) | group/project, subgroups allowed | A personal or project access token with the api scope; the Maintainer role, so the app can create the webhook. |
| Bitbucket Cloud | workspace/repository | A repository access token (Repository settings → Access tokens) with Repositories: Write and Webhooks: Read and write. Atlassian API tokens are not accepted: Atlassian doesn't allow apps to hold them. |
After saving, the app links the repository's .feature files to their work items: by the key at the start of the file name (SHOP-12-checkout.feature) or by an @SHOP-12 tag. Files it can't link are listed on the settings page. Files that were in Jira before you connected go to Git with Send to GitHub (or GitLab, Bitbucket).
- Jira to Git: each save commits the file to the branch, as "Update SHOP-12 scenarios from Jira (Handig BDD)". The panel shows "Committing…", then "In GitHub" with a link to the file.
- Git to Jira: a push to the branch updates the work item within seconds, through the webhook the app created. An hourly check catches pushes whose webhook never arrived.
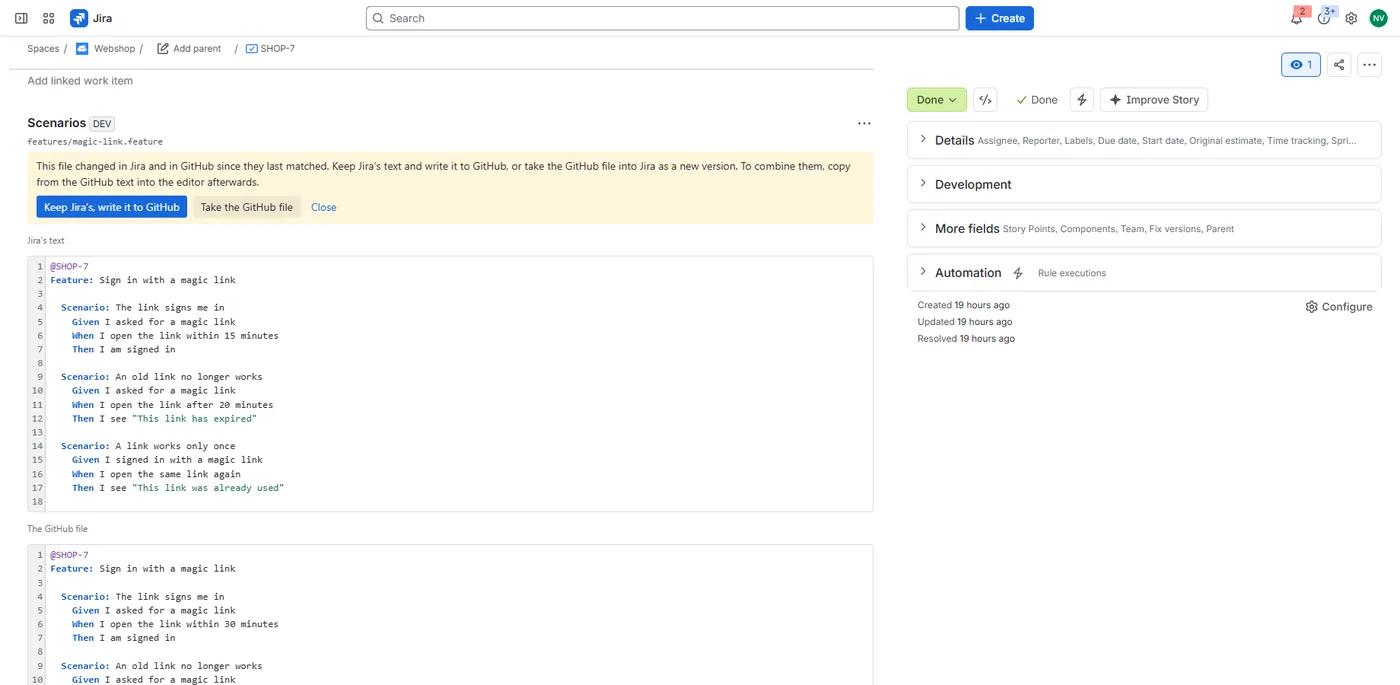
- Changed on both sides: nothing is overwritten. The panel shows Jira's text and the Git file side by side; keep Jira's and write it to Git, or take the Git file as a new version.
- Gherkin errors in Git: the Git file isn't taken over; the panel shows its errors and the same two choices.
- Deleted in Git: Jira keeps the scenarios; Write it back restores the file.
- Renamed in Git: the work item follows the file to its new path.
When the token may not create webhooks, the settings page shows the URL and secret to add yourself: push events only, and on GitHub content type application/json. Once a signed delivery arrives, the page says the webhook works. Disconnect removes the token and the webhook; files in Git and scenarios in Jira stay as they are.
Test results from CI
As a Jira admin, open Jira settings → Apps → Handig BDD → Test results from CI and choose Create key. Copy the key (it is shown once) and the upload URL into your CI's secrets as HANDIG_BDD_KEY and HANDIG_BDD_URL. Then send the Cucumber report after the tests:
curl --fail-with-body -X POST "$HANDIG_BDD_URL" \
  -H "X-API-KEY: $HANDIG_BDD_KEY" \
  -H "X-COMMIT-ID: $(git rev-parse HEAD)" \
  -H "X-BRANCH: $(git rev-parse --abbrev-ref HEAD)" \
  --data-binary @reports/cucumber.json
The settings page has the same step for GitHub Actions, GitLab CI and Bitbucket Pipelines. X-COMMIT-ID, X-BRANCH and X-RUN-URL (a link to the CI run) are optional.
- Reports: Cucumber JSON (cucumber-js
--format json:reports/cucumber.json, Cucumber-JVMjson:target/cucumber.json, Behave-f json -o reports/cucumber.json) or Cucumber messages (cucumber-js--format message:reports/cucumber.ndjson). Up to 4 MB per upload. - Matching: a report's feature goes to the work item named in its file name or
@KEYtags, then to that work item's file by path or Feature name. Outline rows count for their Scenario Outline. - Replies: 202 received (the reply lists features without a work item key), 400 not a Cucumber report, 401 wrong key, 402 no active licence, 404 no key created yet, 413 larger than 4 MB. The settings page shows which features of the last upload were stored, and why others weren't.
- In the panel: each scenario shows passed or failed, with the failing step and its error. Test runs shows the last 20 runs per scenario, with their commit, branch and a link to the run. A scenario that keeps flipping between passed and failed, or passed only on a retry, is marked Flaky.
A new key replaces the old one at once: use Replace key when a key may have leaked.
Move from Behave Pro
Behave Pro keeps scenarios on its own server. Handig BDD imports them in one go:
- Export the project from Behave Pro as a zip of
.featurefiles (Behave Pro's export, or the files from your repository). - As a Jira admin, open Jira settings → Apps → Handig BDD → Import scenarios, enter the project key and choose the zip or the files.
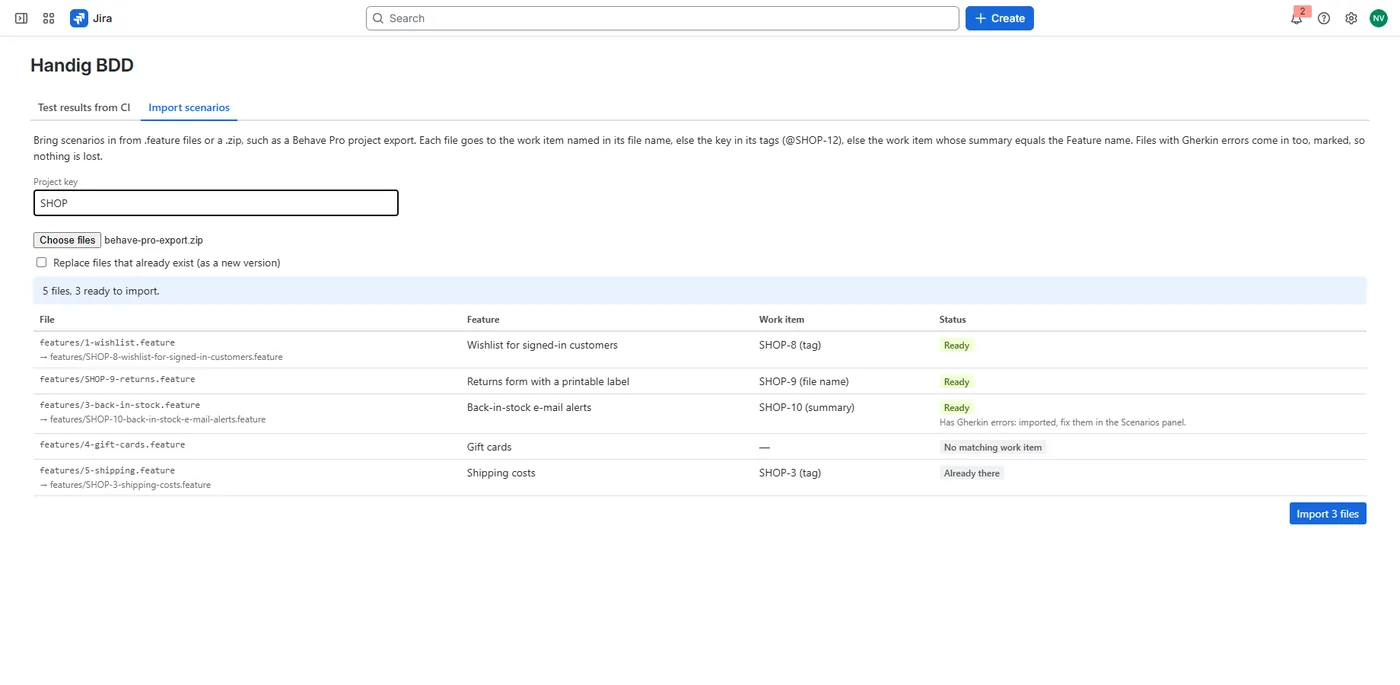
- The preview shows where each file goes: the work item in its file name, else the most frequent
@KEYtag in it, else the work item whose summary equals the Feature name. It also shows files without a match, several work items with the same name, files that already exist and duplicates. - Choose Import. Files are imported in batches of 25. Files with Gherkin errors come in too, marked, so nothing is lost: fix them in the panel, and find them with
bddInvalid > 0.
An import keeps every file whole, and a work item can hold several files, so a Behave Pro feature whose scenarios name different work items stays one file on its main work item. Tick Replace files that already exist to import again over earlier imports (each becomes a new version). When the project is connected to Git, imported files are committed too.
Languages
Handig BDD follows each user's Atlassian language: English, Dutch and French.
Your data
Handig BDD runs on Atlassian Forge. Feature files, their versions, test results and the Git settings are kept in Forge hosted storage; the counts that JQL searches are a property of each work item. The editor of each version is stored as an Atlassian account ID, never a name or e-mail address. Tokens, the webhook secret and the CI key's hash are in Forge's secret storage. When a project is connected to Git, its feature files also go to and come from that repository, at the host you chose, with your token; nothing goes anywhere else. Details are in the privacy policy.
Uninstalling Handig BDD
Atlassian deletes the app's hosted storage according to its retention rules, so export the files you want to keep first, or keep them in Git: files in your repository stay there. The JQL counts stay as properties of your work items until you remove them.
Help
See Support. We answer within 2 business days.